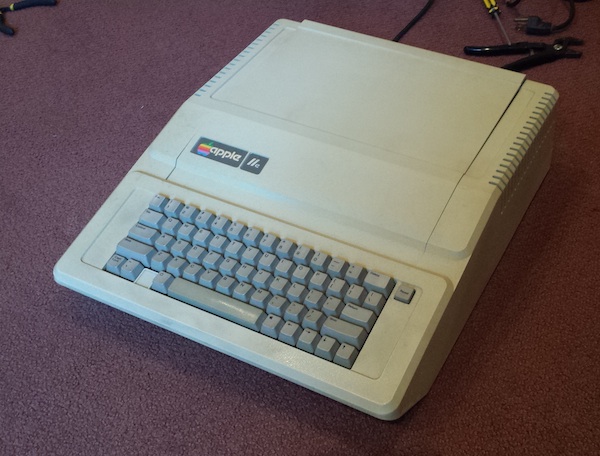
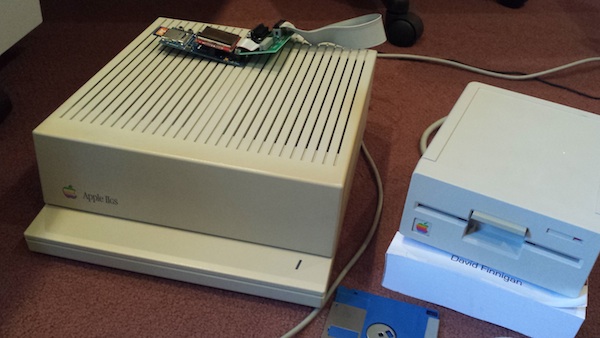
On the road to Apple II floppy disk emulation, I’ve picked up a couple of new members for my retrocomputing collection. Above is a classic Apple IIe – let’s call her Edna. The eBay seller didn’t believe much in bubble wrap or other packing materials, so Edna suffered a cracked corner and bent bottom plate during shipping, but she still works just fine. Below is a boxy fellow I’m calling Gary, an Apple IIgs with ROM revision 01. I also picked up an Apple 3.5 Drive and a 5.25 Drive, and some blank double-density disks. None of the computers or drives came with any bootable disks, though – a fact that would soon create trouble.
Apple II Video Out
When powered up, both computers beeped and seemed to be working OK, but without a monitor I was working blind. The IIgs has an RGB video port that looks like the video connector on a Macintosh II, but none of my Mac video adapters could get any picture from it. I later learned it’s an analog RGB signal at TV frequencies, not VGA frequencies, and is unlikely to work with anything but a true IIgs monitor or a few other CRTs from the 80′s. That meant I was stuck with composite video for both machines – that yellow RCA plug that harks back to the days of Nintendo NES.
What do you connect a composite video signal to in 2015? I tried my living room TV and it worked fine, but I wanted a desk-sized monitor instead of a 40-something inch HDTV. I tried the composite video input on my Dell 2007WFP LCD monitor, but got nothing but a blank screen. Hmmm. After doing some reading, I learned that the composite video output from the Apple IIs isn’t quite NTSC standard, and the 2007WFP rejects marginal video signals like the Apple’s. The similar Dell 2001FP LCD monitor was reported to work well with Apple IIs and other vintage computer equipment, though, and I was lucky to find someone local selling an old 2001FP. Success! Now, anybody want to buy a used Dell 2007WFP?
Bootstrapping with No Disks
With working video, I could boot Edna and Gary, hit control-reset, and have fun typing “STEVE IS GREAT” programs in BASIC. But to really do anything interesting, I needed some disks. For the IIgs, I discovered that you can download a Disk Copy 4.2 image file of IIgs software, use a vintage Mac to write the image to a 3.5″ disk, and the IIgs will happily boot from it. That was great, but it still left me without an easy way of transferring or making 5.25″ disks, or any way of making disks directly with Edna.
Fortunately there’s an excellent piece of software called ADTPro, that can be used to bootstrap an Apple II computer without any other hardware. It works by connecting to the Apple’s cassette in port or serial port, and transfers disk images from a server on a modern PC. Less fortunately, the IIgs doesn’t have a cassette input port, and Edna didn’t come with a serial card. I also didn’t have a Mini-DIN-8 to DB-9 serial cable for making a serial connection to Gary, so that left a cassette port connection to Edna as the only option.
To make a long story short, the ADTPro cassette audio method didn’t work. The first part of the bootstrap process went fine, and I could load the ADTPro client on Edna using the cassette link. But to actually transfer any disk images required two-way communication using two audio cables: one from the PC’s headphone out to the Apple’s cassette in, and another from the Apple’s cassette out to the PC’s microphone in. I’ve only got one PC that even has an analog audio input, and the line level was too low for the ADTPro software to hear the data coming from the Apple. No amount of config changes or level boosting seemed to help. After reading about it, this appeared to be a common problem.
I finally broke down and hand-built a Mini-DIN-8 to DB-9 serial cable for the IIgs, using an Imagewriter II printer cable and a DB-9 cable. It was a lot of fiddly soldering and beeping out wires and swearing at burnt thumbs, but I eventually got it to work. Of course, I learned later that I could have just bought a pre-made cable that’s designed for use with ADTPro. Oh well. With a working serial connection, I can now transfer both 3.5″ and 5.25″ disk images to Gary using ADTPro, and make 5.25″ disks with Gary that will work with Edna. Yes!
Floppy IIGS
The point of all this Apple II business is to get Floppy Emu working on Apple II systems. Floppy Emu has a 19-pin D-SUB connector and can emulate 800K disks, and the IIgs has a 19-pin D-SUB connector and can read 800K disks. So maybe you can just plug it in, load a IIgs disk image, and it will work? Sadly, it’s not that easy, and a direct plug connection to a IIgs doesn’t work. I’m not entirely sure why, but it’s something I’ll be investigating closely.
I’d heard from a couple of people that Floppy Emu did work with the IIgs, if you used part of an Apple 3.5 Drive to make the connection. If you open up an Apple 3.5 Drive, inside is a standard Sony 800K floppy drive (identical to those used in early Macs), and another small board called the daisy chain board. The daisy chain board is what’s actually connected to the computer. The board has an internal private connection to the Sony drive, as well as another 19-pin D-SUB where a second daisy-chained drive can be connected. The photo below shows a partially disassembled Apple 3.5 Drive, with the daisy chain board tucked inside, just behind the actual floppy drive mechanism.
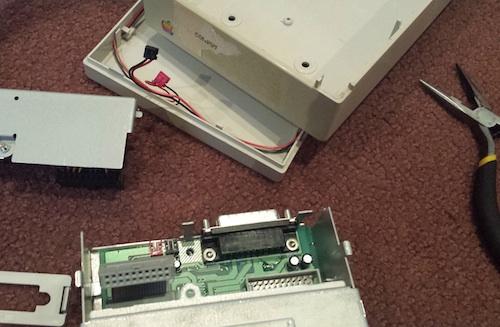
With a screwdriver and some gentle tugging, I was able to further disassemble the drive, separating the daisy chain board from everything else. On the underside of the daisy chain board, not pictured, are some electronics and a custom controller chip of some kind. What does it do? Hmmm.

I took the newly-liberated daisy chain board, and connected it to the IIgs using a 19 pin D-SUB to 20 pin ribbon cable – basically the same cable that I sell in the BMOW store. Then I attached the internal drive connector to a Floppy Emu, running the normal Macintosh floppy firmware.
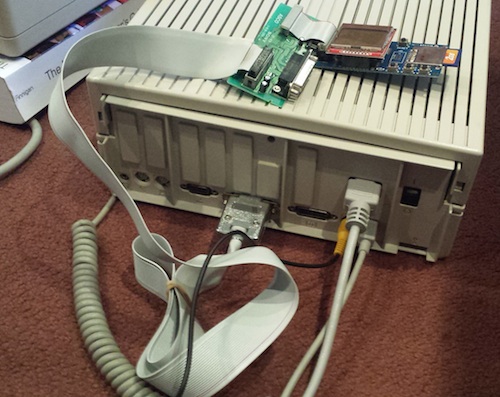
And it worked! I was able to boot GS/OS from an emulated disk on the Floppy Emu with no troubles. I did notice one oddity, however. After accessing the disk, the IIgs always left the disk motor on. Even when the computer wasn’t doing anything, the status LED on the Floppy Emu board continued to flash, and the LCD said “read”. I’m not sure if this is some quirk of my setup, or an issue with the Macintosh floppy firmware being not quite 100% IIgs compatible.
The Mysterious Daisy Chain Circuit
So what does this daisy chain board actually do, that allows the Floppy Emu to work on the IIgs? A detailed answer will have to wait for a future post, but as best as I can tell, it’s just some lightweight interface circuitry that helps identify the drive to the computer, and enable it at the correct time. Other than that, it doesn’t seem to get involved with the actual control of the drive or the data transfer in any way. There’s a schematic of the daisy chain board here: page 1 shows the whole board, and page 2 shows what’s inside of the “DSIC” box on page 1.

It looks like pin 4 of the 19-pin D-SUB (pin 7 of the 20-pin ribbon connector) is used as an extra enable signal, for selecting between 3.5″ and 5.25″ disks on the daisy chain. The drive’s RD line is connected both to the computer’s RD line as well as the computer’s WRPROT line. Then there’s some complex-looking enable circuitry involving a 74LS123 one-shot. As far as I can figure, its behavior is this: if the computer enables the drive by asserting /DRIVE1 and /EN3.5IN, then it can afterwards de-assert /DRIVE1 and the circuit will keep the drive enabled for about a second. But if the computer de-asserts /EN3.5IN, or asserts /DRIVE2, then the drive will be disabled immediately. I have no idea why that behavior is important, but there it is.
About half the schematic is related to the daisy-chain circuitry and the eject button, neither of which I need. (Here’s an edited version of the schematic with all the daisy-chain and eject logic removed.) The enable circuit with the one-shot is confusing, but the rest looks like it might not be too difficult to duplicate. Then I could make a little adapter board that allows the Floppy Emu to plug into a IIgs without sacrificing an Apple 3.5 Drive. Maybe even build the necessary circuitry into future versions of the Floppy Emu. Now I need to set out my tools and get to work!